Turn Clicks to Cash: Build a Web Template That’s Straight Heat
How to Create a Web Page Template
When I first tried to figure out how to create a web page template, I was completely overwhelmed. Seriously, it felt like I had jumped into the deep end without knowing how to swim! I had no clue where to begin, and every design tool I opened made things even more confusing. But after hours of research, trial and error, and testing different ideas, I finally cracked the code. I discovered how to make a web page template that not only looks amazing but also works smoothly. Now, I’m here to share everything I’ve learned so you can skip the confusion and confidently create your own web page template!
Turn Clicks to Cash: Build a Web Template That’s Straight Heat
Why You Need a Web Page Template
Why a Web Page Template Is a Game-Changer
1. Consistency Across Your Website
3. Makes Your Website Easier to Manage
4. Gives Your Website a Professional Look
Bonus: Easier for Team Collaboration
Step 1: Plan Your Web Page Template
Questions I Asked Myself Before Creating My Web Page Template:
Important Pages for a Web Page Template
Step 2: Sketch the Layout of the Web Page Template
What I Put in My Web Page Template
Tools I Used to Sketch My Web Page Template
Step 3: Pick the Best Tools for Building a Web Page Template
Best Website Builders for a Web Page Template
Why Picking the Right Tools Matters
How Easy Navigation Helped My Website
Step 5: Design a Mobile-Friendly Web Page Template
Why Mobile-Friendly Design Is So Important
How I Made My Web Page Template Mobile-Friendly
3. Optimized Images for Faster Loading
4. Vertical Layouts for Small Screens
5. Tested My Web Page Template on Multiple Devices
Extra Tips for a Mobile-Friendly Web Page Template
How Making My Web Page Mobile-Friendly Helped Me
Step 6: Improve SEO for the Web Page Template
Why SEO Matters for a Web Page Template
1. Use Headings to Organize Content
7. Make the Website Mobile-Friendly
Step 7: Add Must-Have Features to the Web Page Template
Step 8: Test the Web Page Template
Why Testing Your Web Page Template Is Important
What I Tested (And Why It Matters)
3. Make Sure It’s Mobile-Friendly
How Testing Improved My Website
Final Tip: Test, Fix, and Test Again!
Step 9: Save and Reuse the Web Page Template
Why Saving and Reusing a Web Page Template Is So Important
Ways I Save My Web Page Template
1. Save as a Layout in Website Builders
2. Turn Designs into WordPress Themes
3. Store Content Sections in Google Docs
4. Save Custom Blocks in Page Builders
5. Export the Template for Backup
6. Use Design Tools for Layouts
7. Duplicate and Customize for New Projects
Tips for Saving and Reusing Web Page Templates
Conclusion: My Journey to Creating the Perfect Web Page Template
Recommended Articles
2025’s Design Revolution: Tools, Trends, and Transformations You Need to Know
Master the Art of Web Page Outlines: Your Blueprint for a High-Performing Website
8 Must-Have Features for the Perfect Video Website Template (Make Your Videos Stand Out!)
Essential Types of Webpages for Every Website (With Examples)
Free IT Website HTML Templates: Download and Build Your Dream Site Today!

Why You Need a Web Page Template
A web page template makes building a website so much easier. It gives you a structure to follow so you’re not starting from zero every single time. You can simply copy the template, change the text and images, and boom—you have a brand-new page that looks just as good as the others. I wish I had learned this sooner!
Why a Web Page Template Is a Game-Changer
Let me explain why learning how to make a web template is one of the smartest things I’ve ever done for my website projects.
1. Consistency Across Your Website
Before I knew how to make a web template, each of my web pages looked a little different. One page might have a blue background, while another used a different shade. The fonts were all over the place, and the layout felt random. It didn’t feel professional at all.
Once I started using a web page template, everything matched perfectly. The fonts, colors, buttons, and images all looked like they belonged together. This is so important because visitors like websites that feel smooth and organized. If every page looks different, people might get confused or think the site isn’t trustworthy.
How a Template Helped Me:
My homepage, about page, and contact page all had the same style.
Navigation was easier because the menus looked the same on every page.
My website looked more professional and put together.
2. Saves a Ton of Time
Before I learned how to make a web template, I spent hours designing each page. It was exhausting! I had to choose new layouts, colors, and fonts every time. However, once I created a solid template, I could reuse it again and again.
All I had to do was swap out the text and images, and my new page was ready to go. This saved me so much time. I could focus more on creating content or improving the site instead of redesigning the same things over and over.
How It Saved Me Time:
I made one design for a blog post and used it for every new article.
Product pages for my online shop all had the same layout.
I didn’t have to start from scratch anymore!
3. Makes Your Website Easier to Manage
Managing a website with lots of pages can be stressful. I used to forget where I put certain features or how I designed specific pages. However after I learned how to make a web template, everything became easier to manage.
If I needed to update something, like changing the font or color, I only had to do it once in the template. Then, it would update across all the pages that used that template. This made keeping my website up-to-date super easy!
Why It Was Easier:
I could change a button style on one page, and it would update everywhere.
I didn’t have to search through dozens of pages to fix small design problems.
My website was more organized, and updates were quicker.
4. Gives Your Website a Professional Look
Before using a web page template, my website looked homemade. I thought it was okay, but when I compared it to professional websites, I realized mine didn’t look as good. Learning how to make a web template helped me design pages that looked polished and professional.
I started paying attention to details like spacing, font sizes, and image placement. The result was a website that looked like it was built by a pro—even though it was just me working from home!
How It Made My Site Look Better:
Clean layouts made it easier for people to read and navigate.
Buttons and links were in the same place on every page.
My site felt modern and user-friendly.
Bonus: Easier for Team Collaboration
Later on, when I worked with other people on website projects, having a web page template was a huge help. I didn’t have to explain every little detail because the template did that for me. My team could easily create new pages using the same design without asking for help.
Why This Was Helpful:
Everyone followed the same design rules.
New pages matched the rest of the site perfectly.
It saved time for everyone on the team.
Step 1: Plan Your Web Page Template
The most important lesson I learned when figuring out how to make a web template was to plan everything before jumping into the design. Trust me, planning your web page template first makes everything easier and more organized. Without a solid plan, it’s easy to get overwhelmed and lose focus on what your website needs. Once I started planning, the entire process became smoother, and my websites looked and worked so much better.
Questions I Asked Myself Before Creating My Web Page Template:
Before I started designing, I sat down and asked myself a few important questions. These helped me figure out what my website needed and how to organize it.
What is the purpose of my website?
Is this going to be a blog, a business site, an online store, or a personal portfolio? Knowing the purpose helped me decide what features and content to include.Who will visit my website?
Understanding my audience helped me design a site that fits their needs. For example, a website for kids should look different from one for professionals.What pages do I need?
I listed out all the pages that would help me achieve my website goals. This kept me focused and prevented me from adding unnecessary pages.
Important Pages for a Web Page Template
After answering those questions, I outlined the essential pages for my web page template. These are the pages I include in almost every website I build, no matter the purpose.
1. Home Page:
The Home Page is the first thing visitors see. It should make a great first impression! I like to include a clear headline, an eye-catching image, and a simple call-to-action button, like “Learn More” or “Shop Now.”
2. About Page:
The About Page tells visitors who I am or what my business is all about. I usually share my story, my mission, and why I created the website. This page is important for building trust and making connections with my audience.
3. Services or Products Page:
If I’m offering something, I need a Services or Products Page. This page is where I show off what I do or what I sell. I keep the layout simple, with clear descriptions and high-quality images. I also make sure to include pricing if it applies.
4. Blog Page:
A Blog Page is perfect for sharing news, tips, or articles. Blogging helps me connect with my audience and improve SEO so more people find my website. Even if it’s just occasional updates, having a blog can make a big difference.
5. Contact Page:
The Contact Page is where visitors can get in touch with me. I always include a simple form, my email, and sometimes even a phone number. If it’s a local business, I add a map and address too.
Extra Pages I Sometimes Add
Depending on the type of website, I might also include these pages in my web page template:
Portfolio Page: To show off my past work if I’m building a creative or professional site.
Testimonials Page: A place for reviews and feedback from happy customers.
FAQ Page: Answers to common questions to help visitors quickly find information.
Shop Page: If it’s an online store, I add a page dedicated to selling products.
Step 2: Sketch the Layout of the Web Page Template
After I planned my website, the next step in learning how to design a web page template was to sketch the layout. This step helped me figure out where everything should go on each page. Trust me, it made designing my website a lot easier!
At first, I thought I could just jump into designing without planning. But things got messy quickly. Once I started drawing out the layout, I could clearly see how the website would look, and it saved me so much time.
What I Put in My Web Page Template
When I was figuring out how to design a web page template, I made sure to include the most important parts that every website needs. These sections helped keep everything organized and easy to use.
Header: This is the very top of the page. I added my logo and a menu with links to the most important pages so visitors can easily navigate my site.
Hero Section: This is a big picture or bold headline right below the header. It grabs attention and tells people what my website is about.
Content Areas: This is where I put my main information, like text, pictures, and videos. I made sure it was neat and easy to read.
Sidebar (Optional): On some pages, I added a sidebar with extra links or news. This is great for blogs or online stores.
Footer: At the bottom of every page, I included my contact information and links to my social media pages.
Why This Layout Is Important
Having a good layout makes the website look professional and easy to use. When I learned how to design a web page template, I realized how important it is to make it simple for visitors to find what they need. A clean, well-organized layout helps people stay on the site longer and makes them more likely to explore.
Tools I Used to Sketch My Web Page Template
I didn’t need expensive tools to start working on my layout. Here are the tools that helped me when I was learning how to design a web page template:
Pen and Paper: This was the fastest and easiest way to draw my ideas. I sketched out different layouts and picked the one I liked best.
Figma: Once I had a rough sketch, I used Figma, a free design tool, to make my layout digital. It’s great for beginners and really helped me organize my ideas.
Canva: Canva is another easy tool I used. It helped me create simple designs and try out different layouts.
How Sketching Helped Me
Drawing my layout gave me a clear plan to follow. I wasn’t guessing where things should go—I knew exactly how each page would look. This step made designing my website so much faster and better. Learning how to design a web page template was much easier once I had a sketch to guide me.
So if you're starting your own website, take a few minutes to draw out your ideas. It doesn’t have to be perfect! A simple sketch can save you hours later and make your website look more professional.
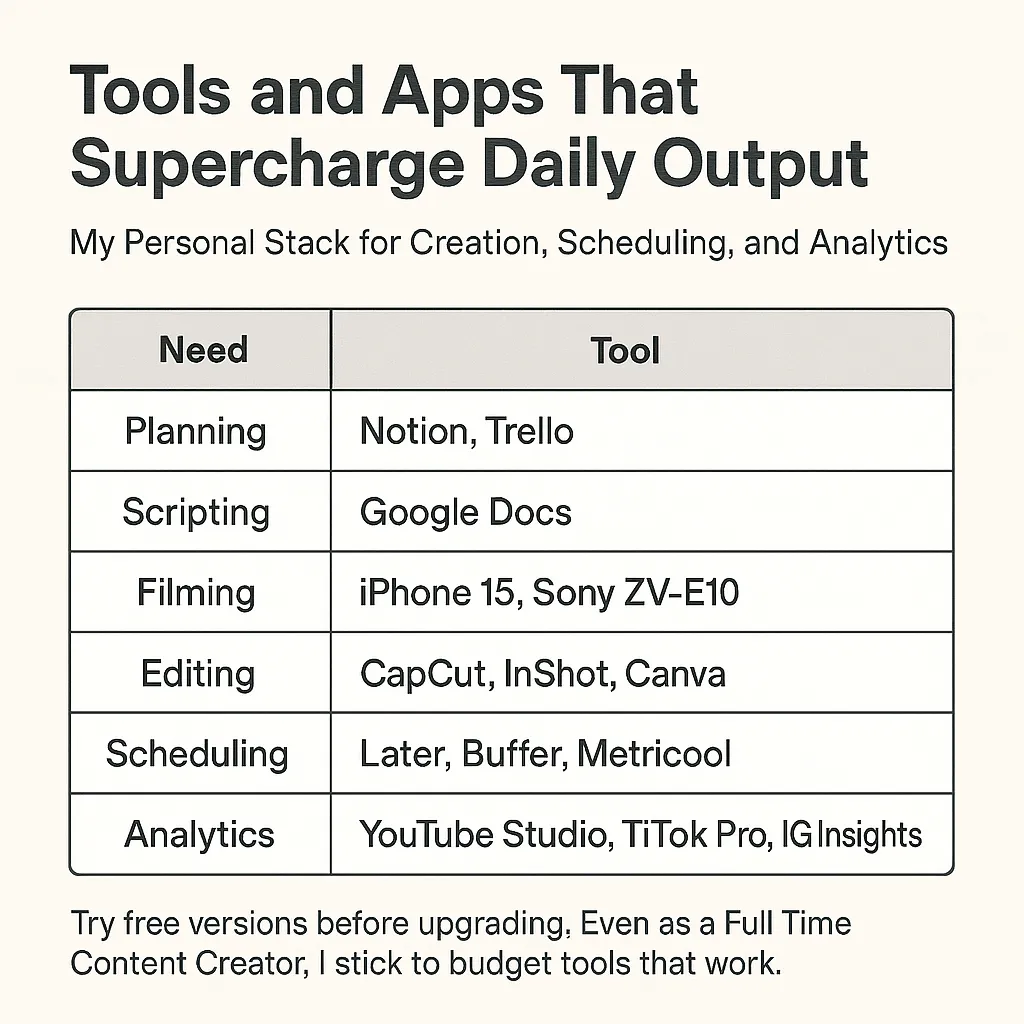
Step 3: Pick the Best Tools for Building a Web Page Template
One of the biggest lightbulb moments I had while figuring out how to design a web page template was realizing this hard truth: even the most stunning, mind-blowingly gorgeous website is basically invisible if Google can’t find it. Seriously, you could design the Beyoncé of websites, but if it’s not SEO-friendly, it’s like performing at a concert with no audience—just you, the crickets, and a confused janitor.
That’s where SEO (Search Engine Optimization) struts in like the life of the party—wearing a suit made entirely of keywords. SEO is basically your website’s hype person, screaming to Google, “HEY! Check me out! I’m worth clicking!” Without it, your website is stuck in the digital void, awkwardly sipping punch in the corner while everyone else gets all the attention.
Moral of the story? It doesn’t matter how drop-dead gorgeous your site is—if Google can’t see it, no one else will. And let’s be honest, your website is way too fabulous to be lurking in the shadows like a socially anxious bat.

Best Website Builders for a Web Page Template
Website builders are tools that help you make a website without needing to know how to code. They come with easy drag-and-drop features, so you can move things around and see how your page looks in real time. Here are the ones I tried and loved:
Wix: This is perfect for beginners. It has lots of templates and is really easy to use. I used Wix when I first learned how to design a web page template because it helped me understand how to arrange everything.
Squarespace: This builder is great for making beautiful, modern designs. If you want your website to look clean and professional, Squarespace is a good choice.
WordPress: WordPress is super customizable. I used this when I wanted more control over how my website worked. It has lots of themes and plugins, but it takes a little more time to learn.
Webflow: Webflow is more advanced, but it’s really powerful. I used this when I wanted to create something more unique and detailed. It’s great for people who want more creative freedom.
Helpful Design Tools
Besides website builders, I also used design tools to make my web page look even better. These tools helped me with images, fonts, and layouts.
Canva: Canva is my favorite for making graphics. I used it to design banners, buttons, and social media images. It’s super easy and has tons of templates.
Unsplash: This is a website full of free, high-quality photos. I used Unsplash to find beautiful images for my web page template. It made my site look professional without spending any money!
Google Fonts: Fonts can change how a website feels. Google Fonts has tons of free fonts that I used to make my text look clean and easy to read.
Why Picking the Right Tools Matters
When I first started learning how to design a web page template, I tried to use too many tools at once. That just made things confusing! But once I focused on the tools that fit my needs, everything got so much better.
Here’s What Happened:
My designs looked more professional.
I finished my projects faster.
I actually had fun building websites!
My Advice for You
If you’re just starting to learn how to design a web page template, choose one website builder and a few design tools. Don’t try to use everything at once. Start simple and get comfortable. Once you feel ready, you can try more advanced tools!
Step 4: Make Navigation Easy
One of the most important lessons I learned while figuring out how to design a web page template was how crucial easy navigation is. Imagine walking into a store where nothing is labeled, and you can’t find what you need. You’d probably leave, right? Well, websites work the same way! If visitors can’t quickly find what they’re looking for, they’ll leave and may never come back.
When I first started designing web pages, I didn’t think much about navigation. I added a bunch of links everywhere and thought it would be fine. But I noticed people weren’t staying on my site for long. That’s when I realized I needed to simplify things. Once I made my navigation clear and easy to use, visitors stayed longer and clicked on more pages.
Tips for Easy Navigation
Here are the simple changes I made that completely improved my website’s navigation. These are must-haves when learning how to design a web page template:
1. Simple Menus
At first, I thought more links meant a better website. I was wrong! Too many menu items overwhelm visitors. People want to find what they need fast.
What I Did:
I kept my menu to 4–6 main links.
I only included important pages like Home, About, Services, Blog, and Contact.
I moved less important pages into drop-down menus to keep things clean.
Why It Works:
A simple menu makes it easy for visitors to find the most important parts of your website without getting lost.
2. Clear Labels
I used to get creative with page names, like calling my “Contact” page something like “Let’s Chat.” But people didn’t click on it because they didn’t know what it was! I learned that using clear, simple words works best.
What I Did:
I used common, easy-to-understand labels like Home, About, Services, and Contact.
I avoided confusing or fancy names that might confuse visitors.
Why It Works:
Visitors instantly know where to click. Clear labels help people move around your site without thinking too hard.
3. Add a Search Bar
Not everyone wants to click through menus to find what they need. Adding a search bar was a game-changer for me when learning how to design a web page template.
What I Did:
I placed a small search icon at the top of my site where it’s easy to find.
I made sure the search bar worked well, so people could quickly find blog posts or products.
Why It Works:
Visitors can type in exactly what they’re looking for and get results fast. This keeps people on your site longer.
4. Use a Sticky Menu
A sticky menu is a navigation bar that stays at the top of the page, even when you scroll down. I didn’t use this at first, but once I added it, my site became so much easier to use!
What I Did:
I made my menu stick to the top of the page.
I kept it small and simple, so it didn’t cover content.
Why It Works:
Visitors can always see the menu and quickly move to different pages without scrolling all the way back up.
How Easy Navigation Helped My Website
After making these changes, I noticed visitors stayed longer on my website and clicked on more pages. People told me it was easier to find things, and my bounce rate (how fast people leave a website) went down.
When learning how to design a web page template, I realized that easy navigation isn’t just about looking good—it’s about making sure people can use your site without getting frustrated. And trust me, when visitors are happy, they stick around longer and are more likely to come back!
If you’re designing a website, keep your navigation simple and clear. It’s one of the best things you can do to make your site better!
Step 5: Design a Mobile-Friendly Web Page Template
One of the next things I learned while figuring out how to design a web page template was how crucial it is to make it mobile-friendly. These days, most people browse the internet on their phones or tablets, not just on desktop computers. If your website doesn’t work well on a mobile device, visitors will leave in seconds!
At first, I focused only on how my site looked on a computer screen. But when I checked it on my phone, it was hard to navigate, the images were too big, and the text was hard to read. That’s when I realized I needed to design a mobile-friendly web page template. Once I did, my website looked better, worked faster, and more people stayed on it longer.
Why Mobile-Friendly Design Is So Important
Before I dive into how I made my site mobile-friendly, here’s why it matters:
More Traffic Comes from Mobile Devices: Over half of internet users browse on their phones. If your site doesn’t look good on a small screen, you’re losing visitors.
Google Loves Mobile-Friendly Sites: Google ranks mobile-friendly websites higher in search results, which means more people can find your site.
Better User Experience: People are more likely to stay on your site if it’s easy to navigate on their phone.
If you’re learning how to design a web page template, making it mobile-friendly should be one of your top priorities.
How I Made My Web Page Template Mobile-Friendly
Here’s exactly what I did to make sure my web page template worked smoothly on all devices:
1. Simple Menus
When I used a regular menu on mobile, it took up too much space and was hard to use. I switched to a hamburger menu—you know, those three little lines you tap to open a menu. This saved space and made it easier for people to navigate.
What I Did:
I replaced my regular menu with a collapsible hamburger menu.
I limited menu options to the most important pages.
I kept menu labels clear and simple.
Why It Works:
Simple, collapsible menus make it easier for visitors to explore your site without feeling overwhelmed.
2. Large, Easy-to-Tap Buttons
I didn’t realize how hard it was to click tiny buttons on a phone until I tried it myself! On a touchscreen, small buttons are frustrating. So, I made sure all my buttons were big enough to tap easily.
What I Did:
I increased the size of buttons and links.
I added more space between clickable items to prevent accidental taps.
I used bold colors for buttons to make them stand out.
Why It Works:
Larger buttons improve navigation and make it easier for users to take action, like signing up or making a purchase.
3. Optimized Images for Faster Loading
Big image files slowed down my website on mobile devices. People won’t wait for a slow site to load, so I made my images smaller and faster to load.
What I Did:
I used tools like TinyPNG and ImageOptim to compress images without losing quality.
I chose the right file types: JPEG for photos and PNG for graphics.
I used lazy loading so images load only when someone scrolls to them.
Why It Works:
Optimized images help your website load faster, keeping visitors happy and improving search engine rankings.
4. Vertical Layouts for Small Screens
I used to design my pages in wide layouts for computer screens. But on a phone, that doesn’t work! So, I switched to vertical layouts that stack content neatly.
What I Did:
I stacked images and text vertically instead of side-by-side.
I made sure the most important content was at the top of the page.
I avoided using too many columns, which don’t work well on mobile.
Why It Works:
Vertical layouts fit perfectly on small screens and make it easier for users to scroll through content.
5. Tested My Web Page Template on Multiple Devices
A big mistake I made was not checking how my site looked on different devices. Now, I always test my web page on phones, tablets, and desktops.
What I Did:
I previewed my site on my phone, tablet, and desktop.
I used online tools like Google Mobile-Friendly Test and BrowserStack to check how my site looks on different devices.
I asked friends and family to browse my site and give feedback.
Why It Works:
Testing on multiple devices helps me catch issues and make sure my website works smoothly for everyone.
Extra Tips for a Mobile-Friendly Web Page Template
Use Responsive Design: Most website builders like Wix, Squarespace, and WordPress offer responsive design templates that automatically adjust to different screen sizes.
Limit Pop-Ups: Pop-ups can be annoying on mobile. I use smaller pop-ups or slide-ins that don’t cover the entire screen.
Readable Fonts: I made sure my fonts were big enough (at least 16px) so people could read my content without zooming in.
Simple Forms: I kept forms short and easy to fill out on a phone. Fewer fields = more responses!
How Making My Web Page Mobile-Friendly Helped Me
After I made these changes, I noticed a huge difference. More people stayed on my site, clicked on links, and even signed up for my newsletter. My site loaded faster, and visitors told me it was much easier to use.
Making a mobile-friendly web page template wasn’t just a small improvement—it made my website so much better. If you’re learning how to design a web page template, don’t wait to make it mobile-friendly. Your visitors (and Google) will thank you!
Step 6: Improve SEO for the Web Page Template
Lets keep it going , another big"aha!" moments I had while learning how to design a web page template was realizing that even the most jaw-droppingly gorgeous website is basically invisible if Google can’t find it. I mean, you could have the Mona Lisa of websites, but if it’s not SEO-friendly, it’s like hanging it in your basement and wondering why no one’s complimenting your taste in art.
That’s where SEO (Search Engine Optimization) swoops in like a superhero in a cape (probably made of keywords). SEO is what tells search engines, “Hey! Look at me! I’m important!” Without it, your site is just sitting in the internet void, twiddling its digital thumbs.
So, lesson learned: no matter how pretty your site looks, if Google can’t see it, neither will anyone else. And trust me, your website deserves more than hiding in the shadows like a shy raccoon.
At first, I didn’t think SEO was that important. I thought, “If my website looks good, people will come.” But I was wrong! Without SEO, no one even knew my site existed. Once I started using simple SEO strategies, my website began showing up in search results, and I started getting more visitors.
Why SEO Matters for a Web Page Template
If you're serious about learning how to design a web page template, you need to understand why SEO is so important.
More Visibility: Good SEO makes your website appear on Google when people search for topics related to your site.
More Visitors: When your website shows up higher in search results, more people will click on it.
Better User Experience: SEO makes your site easier to use, which keeps visitors happy and on your site longer.
Simple SEO Tips I Used
Here are the SEO strategies that made a big difference for me when designing my web page template.
1. Use Headings to Organize Content
I used to just make my text big and bold for section titles, but I learned that proper headings are super important for SEO. Google reads your headings to understand what your page is about.
What I Did:
I used H1 for the main page title.
I used H2 for important sections and H3 for smaller points.
I included keywords in my headings, like "How to Design a Web Page Template."
Why It Works:
Headings make your content easier for search engines and visitors to read and understand.
2. Add Alt Text to Images
At first, I didn’t know what alt text was, but now I know it’s a must for SEO! Alt text is a short description of an image that helps search engines understand what the picture is about.
What I Did:
I added short, clear descriptions to every image.
I used keywords in the descriptions when it made sense.
Example:
For an image of a web page sketch, I used:
"Simple sketch showing how to design a web page template layout."
Why It Works:
Alt text improves SEO and makes your website more accessible to people using screen readers.
3. Speed Up the Website
I found out that slow websites can hurt SEO. People leave if a page takes too long to load, and Google notices that! So, I worked on making my website faster.
What I Did:
I compressed images using TinyPNG.
I used fewer plugins and apps that slow down loading.
I chose a fast and reliable website hosting service.
Why It Works:
Faster websites rank higher on Google, and visitors stay longer.
4. Write Meta Descriptions
I used to skip writing meta descriptions, but now I know they’re super important. A meta description is the short summary that appears under your website link in search results.
What I Did:
I wrote a clear and interesting description for each page.
I included keywords naturally.
Example:
"Learn how to design a web page template with easy steps for beginners. Create a professional and mobile-friendly website today!"
Why It Works:
A good meta description makes people more likely to click on your website when they see it in search results.
5. Use Keywords Naturally
Keywords are the words people type into Google to find what they need. I learned that using keywords in the right places helps my website rank higher.
What I Did:
I used keywords like "how to design a web page template" in my headings and content.
I added keywords to image alt text and meta descriptions.
I avoided keyword stuffing (using the same word too many times), which can hurt SEO.
Why It Works:
Using relevant keywords helps search engines understand what your site is about and match it with searchers.
6. Link to Other Pages
I learned that linking to other pages on my website (called internal linking) helps with SEO and makes it easier for visitors to explore my site.
What I Did:
I added links to related blog posts and pages.
I used clear link text like “Learn more about web design basics here.”
Why It Works:
Internal links help search engines find all your content and keep visitors on your site longer.
7. Make the Website Mobile-Friendly
Google gives better rankings to mobile-friendly websites. I made sure my web page template worked well on phones and tablets.
What I Did:
I used a responsive design that adjusts to screen size.
I tested my site on mobile devices to make sure it looked good.
Why It Works:
Most people browse on their phones, so a mobile-friendly site improves user experience and SEO.
8. Add a Sitemap
I didn’t know what a sitemap was until I started learning more about SEO. A sitemap tells search engines about all the pages on your website.
What I Did:
I used website builders like Wix and WordPress to create a sitemap.
I submitted the sitemap to Google Search Console.
Why It Works:
Sitemaps help search engines find and index all your pages faster.
9. Use SEO-Friendly URLs
At first, my page URLs were messy, like “mywebsite.com/page1”. I changed them to clear and simple URLs with keywords.
What I Did:
I used clean URLs like “mywebsite.com/how-to-design-a-web-page-template”.
I avoided using random numbers or symbols in URLs.
Why It Works:
Simple URLs are easier for Google to read and more likely to get clicked on.
10. Keep Content Fresh
Google loves new and updated content. I used to forget about my website after publishing it, but now I update it regularly.
What I Did:
I updated my blog with new posts about web design.
I refreshed older pages with new images and better keywords.
Why It Works:
Updated content keeps your website relevant and improves your search rankings.

How SEO Improved My Website
After making these SEO changes, I started seeing real results. My website moved up in Google search results, and more people started visiting. It wasn’t instant, but over time, my hard work paid off.
If you’re learning how to design a web page template, don’t skip SEO! Even simple steps like adding headings and using keywords can make a huge difference. It’s the secret sauce that helps people find your amazing website!
Step 7: Add Must-Have Features to the Web Page Template
A great web page template needs more than just good looks. It should work well too!
Important Features I Added:
Call-to-Action (CTA) Buttons: Like “Sign Up” or “Contact Me.”
Contact Form: Easy way for people to reach me.
Testimonials: Customer reviews build trust.
Social Media Links: Connect visitors to my profiles.
Newsletter Signup: Grows my email list.

Step 8: Test the Web Page Template
One of the biggest lessons I learned while figuring out how to design a web page template was this: Never launch without testing! I was so excited to get my site live, but I quickly realized that skipping testing could lead to a lot of problems. From broken links to slow loading speeds, even small mistakes can turn visitors away.
So, before launching my web page template, I took the time to carefully test every part of it. Testing helped me find and fix issues I didn’t even know existed, making my website better and more user-friendly.
Why Testing Your Web Page Template Is Important
No matter how amazing your design is, if your website doesn’t work properly, visitors will leave. Testing helps ensure that your web page template:
Runs Smoothly: Everything works the way it should.
Loads Quickly: No one wants to wait for a slow site.
Looks Great on All Devices: Mobile, tablet, and desktop views all matter.
Is Easy to Use: A user-friendly experience keeps visitors engaged.
If you're serious about learning how to design a web page template, testing must be part of your process.
What I Tested (And Why It Matters)
Here’s exactly what I focused on when testing my web page template:
1. Check All Links
Broken links are one of the fastest ways to lose a visitor’s trust. I made sure every link led to the right page.
What I Did:
Clicked every link on my site to make sure they worked.
Checked both internal links (to other pages on my site) and external links (to other websites).
Tools I Used:
Broken Link Checker (an online tool that scans for broken links).
Manually clicked through pages.
Why It Works:
Fixing broken links ensures that visitors can easily navigate my site and find the information they need.
2. Test Page Loading Speed
I learned that people leave slow websites. If it takes longer than a few seconds to load, visitors are gone. Testing for speed helped me fix this.
What I Did:
Compressed large images.
Removed unnecessary plugins.
Minimized code (HTML, CSS, and JavaScript).
Tools I Used:
Google PageSpeed Insights: Checked my website’s speed and gave tips to improve it.
GTmetrix: Gave me a full report on what was slowing down my site.
Why It Works:
A fast website keeps people engaged and also ranks higher on search engines like Google.
3. Make Sure It’s Mobile-Friendly
Since most people use their phones to browse, I made sure my web page template looked and worked great on all screen sizes.
What I Did:
Opened my website on different devices: phones, tablets, and computers.
Used responsive design to make sure the layout adjusted smoothly.
Tools I Used:
Google Mobile-Friendly Test: Checked if my site worked well on mobile.
BrowserStack: Showed how my website looks on different devices and browsers.
Why It Works:
Visitors are more likely to stay on my site if it’s easy to use on any device.
4. Get User Feedback
Sometimes, I’m too close to my own design to see problems. So, I asked friends and family to test my site and give honest feedback.
What I Did:
Asked them to navigate the site and point out anything confusing.
Had them test forms, links, and buttons.
Listened to suggestions and made changes.
Why It Works:
Fresh eyes catch mistakes I missed and give me ideas to make the site even better.

5. Test Forms and CTAs
My contact form and sign-up buttons were key parts of my site, so I made sure they worked perfectly.
What I Did:
Filled out every form to make sure submissions worked.
Clicked on every Call-to-Action (CTA) button to confirm they led to the correct pages.
Why It Works:
Visitors won’t fill out forms or click buttons if they don’t work. Testing these features keeps the site functional.
6. Cross-Browser Testing
Websites can look different on each browser. I made sure my site worked on all the popular browsers.
What I Did:
Checked my site on Chrome, Firefox, Safari, and Microsoft Edge.
Tested on both old and new versions of these browsers.
Tools I Used:
BrowserStack: Showed how my website looked on different browsers and devices.
CrossBrowserTesting.com: Another tool for browser testing.
Why It Works:
Not everyone uses the same browser. Testing across browsers makes sure everyone sees my site the way I intended.
7. Test for Accessibility
I wanted my website to be usable for everyone, including people with disabilities. I tested for accessibility to make sure all visitors could navigate my site.
What I Did:
Added alt text for images.
Made sure the text had enough contrast against the background.
Checked that the site could be navigated with a keyboard.
Tools I Used:
WAVE (Web Accessibility Evaluation Tool): Helped me check for accessibility issues.
Google Lighthouse: Provided accessibility reports and suggestions.
Why It Works:
A more accessible website reaches a larger audience and makes the site more user-friendly for everyone.
8. Security Testing
Keeping my site safe from hackers was another important step.
What I Did:
Installed an SSL certificate for a secure connection (https://).
Used strong passwords for admin accounts.
Updated plugins and software regularly.
Tools I Used:
SSL Checker: Confirmed my SSL certificate was active.
Sucuri SiteCheck: Scanned for security threats.
Why It Works:
A secure website protects user data and builds trust with visitors.
How Testing Improved My Website
After testing, I fixed several problems I didn’t even know existed! My pages loaded faster, my links worked, and my site looked great on every device. The result? More visitors stayed on my site longer, and I started getting more sign-ups and messages through my contact form.
Testing may feel like extra work, but trust me—it’s worth it! If you’re learning how to design a web page template, make sure to test everything before launching.
Final Tip: Test, Fix, and Test Again!
Testing isn’t just a one-time thing. Every time I update my website, I test it again. This way, I can keep everything running smoothly and continue to improve my site.
Remember:
Test all links.
Check loading speed.
Make sure it’s mobile-friendly.
Ask for feedback.
Double-check forms and buttons.
Step 9: Save and Reuse the Web Page Template
After all the hard work I put into designing and testing my web page template, the last thing I wanted to do was start from scratch on my next project. That’s when I realized how important it is to save and reuse the web page template. This step has been a total game-changer for me! It’s one of the best ways to save time, stay organized, and keep my designs consistent.
Whether you’re creating websites for yourself or for clients, having a reusable template means you can launch new pages or even whole websites faster and with less stress.
Why Saving and Reusing a Web Page Template Is So Important
Before I started saving my templates, every new project felt like reinventing the wheel. Now, I can focus more on creativity and content because the structure is already done. If you’re learning how to design a web page template, this step will make your future projects much easier!
Here’s why it’s so valuable:
Saves Time: No need to rebuild layouts from scratch.
Keeps Designs Consistent: Every page matches your brand.
Easier Updates: You can quickly make changes across multiple pages.
Speeds Up Workflow: More time to focus on content and creativity.
Ways I Save My Web Page Template
I explored several ways to save my web page template for future projects. Each method has its own benefits depending on the platform you use.
1. Save as a Layout in Website Builders
Most drag-and-drop website builders like Wix, Squarespace, and Webflow make it super easy to save layouts.
What I Did:
In Wix, I saved my page design as a custom template so I could reuse it.
In Squarespace, I duplicated pages and adjusted the content as needed.
In Webflow, I turned sections into reusable symbols for fast editing.
Why It Works:
Website builders let me reuse entire page designs or just specific sections. This saves tons of time and keeps the design consistent across all my pages.
2. Turn Designs into WordPress Themes
Since WordPress is so popular, I wanted to make sure I could save and reuse templates there too.
What I Did:
I used page builders like Elementor and Beaver Builder to save pages as templates.
I created a child theme to reuse my custom designs without changing the main theme.
I exported the theme to use it on other websites.
Why It Works:
WordPress lets me save my design as a theme or template, making it super easy to reuse for future projects or clients.
3. Store Content Sections in Google Docs
Sometimes I didn’t need to save the whole design, just the content. That’s when I started saving sections of my web page in Google Docs.
What I Did:
I saved common content sections like About Me, Services, and FAQs in Google Docs.
I organized the content into folders by website or project.
I added notes about which images or icons to use with each section.
Why It Works:
This made it quick and easy to copy and paste ready-to-go content into new designs. Plus, I could access it from anywhere!
4. Save Custom Blocks in Page Builders
Many website builders and CMS platforms let you save smaller sections of your design—like buttons, footers, and hero sections—as reusable blocks.
What I Did:
In Elementor, I saved custom blocks for contact forms, testimonials, and CTAs.
In Divi, I created and saved custom modules for future use.
I reused these blocks across multiple pages to save time.
Why It Works:
Instead of redesigning small sections over and over, I just dropped in my saved blocks and adjusted the content.
5. Export the Template for Backup
One thing I learned the hard way was the importance of backing up my templates. Once I lost hours of work due to a site error. Never again!
What I Did:
Exported my template as a file in WordPress or Webflow.
Saved it in cloud storage like Google Drive or Dropbox.
Created folders labeled by project for easy access.
Why It Works:
Backing up templates gives me peace of mind and lets me easily import them to other projects.
6. Use Design Tools for Layouts
Sometimes, I wasn’t ready to build the full website, so I saved my layouts in design tools like Figma and Canva.
What I Did:
Used Figma to create wireframes and design mockups.
Saved completed designs in Canva for future use.
Why It Works:
Design tools let me plan layouts and visuals before moving them to a website builder.
7. Duplicate and Customize for New Projects
When I started getting more projects, I needed to move fast. I found that duplicating my existing template and customizing it was the fastest way to launch a new site.
What I Did:
I duplicated full pages and only changed the content, colors, and images.
Used my existing layouts but gave each project its own unique look.
Why It Works:
I didn’t have to start from scratch every time, but each site still felt fresh and different.
Tips for Saving and Reusing Web Page Templates
Here are a few extra tips that helped me make the most of my saved templates:
Name Your Files Clearly: Use names like “Portfolio_Homepage_Template” or “Contact_Page_Template” so you know exactly what’s in the file.
Organize by Project or Industry: If you work on multiple types of websites (e.g., blogs, stores, portfolios), keep separate folders for each.
Update Templates Regularly: Don’t let your templates get outdated. Refresh them with new trends or features.
Test the Template Again: Even when reusing, always test the design to make sure everything still works perfectly.
Conclusion: My Journey to Creating the Perfect Web Page Template
Learning how to create a web page template was a journey that completely transformed how I approach web design. I started off overwhelmed and unsure, but through research, practice, and trial and error, I discovered that building a professional and effective website doesn’t have to be complicated. With each step—from planning and sketching to designing and optimizing for SEO—I gained confidence and developed skills that made the process easier and much more enjoyable.
What truly made the difference was understanding the power of a well-structured web page template. It gave my websites a consistent look, saved me so much time, and made managing updates incredibly simple. By focusing on essential features like easy navigation, mobile-friendliness, SEO optimization, and adding helpful tools like CTAs and contact forms, I built templates that not only looked great but worked smoothly for visitors.
Saving and reusing my web page template was the final piece of the puzzle. It allowed me to work faster and smarter, helping me take on more projects without sacrificing quality. Now, designing a website feels exciting instead of overwhelming because I know I have a solid foundation to build on.
If you’re feeling lost on where to start, remember this: creating a web page template doesn’t have to be hard. Start small, plan carefully, and use the right tools. Learn from my experience, and soon enough, you’ll have a website that looks professional, works perfectly, and keeps visitors coming back.